
Q: Is this mod UPS-friendly?
A: Yes, this mod does not perform frequent updates nor using on_tick event. The GUI is refreshed only once per interval of 15 s (adjustable under "Options" → "Mod settings" → "Startup"). Refreshes should not take noticeable time in most megabases.
Q: Is this mod MP-ready? Say, can the enemy teams see my trains, or edit my templates and lines?
A: Sure, yes. This mod should be multiplayer compatible (both PvP and PvE), as players can only view trains of their own forces in the train list. Each force has its own set of name templates, colour templates, and lines.
Q: What is "stalled" train? I do not see such definition in vanilla game or other mods.
A: It is defined by this mod, so no surprise never seeing that. A stalled train is defined as a train waiting at a signal or a station, but the waiting time is longer than a threshold of 120 s (adjustable under "Options" → "Mod settings" → "Map").
I feel this addition will be extremely helpful to train management, as a train waited for 10 seconds at a junction (say, for another train to pass and clear) is perfectly normal; but a train waited for 10 minutes at the same place certainly means something is wrong. It is important that only the latter will show up in the alert list to get users' attention.
Q: I am not satisfied with the current train layout notations provided. Can I propose a new one?
A: Yes, for sure! The three notations provided by this mod are only the most basic ones that are sufficient for my own use, but various users (like you) can prefer to use your own set of notations.
So feel free to provide the name of your favourite notation, and all the rules and needed details to make it work in Discussion section!
Technical Details
Train Status
This mod uses colour-coded signals to represent train statuses, which are listed as follows:

Train statuses are displayed in the Railway GUI (mentioned in below sections), and are used in display filtering.
Both status yellow (waiting) and status magenta (stalled) are used on a train that is waiting at a station or a signal. The only difference is its waiting time. It starts to be yellow, but will turns magenta when waited longer than a threshold of 120 seconds. Such threshold can be adjusted to your choice, under "Options" → "Mod settings" → "Map".
Train Line
In real-life, a bus line refers to a set of schedule where several buses are sharing, with a set of bus stations they will regularly stop by. It is likewise for a tram line and a train line.
Such concept does not exist in Factorio vanilla game, as the users have to adjust the schedules of each train individually.
This mod implements this concept of "train line". Users can use save the schedule of a train as template, then apply the template to other trains. Those trains are under the same line, with identical stations and waiting conditions set in schedule. This saves you the hassle in schedule editing/copying, allowing you to assign train schedules much easier.
Train Layout
In the train layout representations, a carriage symbol (currently only letters are used) denote each carriage in a train, listed as follows:

Notations
For the whole train, symbols from all carriages altogether can represent the train layout. One carriage symbol for each carriage forms the natural notation "Explicit notation".
For longer trains, however, "Explicit notation" is not the most intuitive way to show the train layout. Say, counting the number of "C"s every time for a series of cargo wagons is not convenient.
So this mod proposes the "Group notation", which have the following rules:
- Consecutive (one or more) carriages of the same type are grouped together.
- Each group of carriages are represented by the number of carriages, followed by the carriage symbol. For example, four cargo wagons are represented as "4C".
This mod also proposes the "Short notation", which can be even more compact. It has similar set of rules:
- Consecutive (one or more) carriages of the same type are grouped together.
- Each group of carriages are represented by the number of carriages (but skipped for only one carriage in the group), followed by the carriage symbol. For example, four cargo wagons are represented as "4C". One cargo wagon is represented as "C" directly.

Locomotive Direction
Notation is only the "part one" of the train layout representations! The second option is on different representation of locomotives in different directions.
Default setting is not caring about the locomotive direction, using the same symbol "L" for all locomotives. However, users favouring top-and-tail (or dual-headed) trains may perfer to indicate direction in locomotives. There are other options to be chosen from, listed as follows:

Connection Sign
The third part is the use of connection sign (using hyphen "-" or plus sign "+").
Default setting is not using any connection sign, which is best for short and concise representations. However, for users prefering long and complete representations, applying connection signs are make the layouts easier to be read. Options allow users to apply connection signs between carriage groups and even between two consecutive locomotives.

Customizing Train Layouts
Notice that you can freely combine any of the three parts mentioned above, to create the representation you most needed! The following table shows some suggested combinations:

The possible combinations provided by current options is a lot, but still may not yet be exhaustive enough to include favourite layouts prefered by all users. If you see any options should be added to any of the above lists, feel free to provide the details in Discussion section!
User Guide
Enabling Railway GUI
The railway controller icon button is located at the top frame, available from enabling this mod. The number displayed on lower-right corner of the icon indicates the number of all trains in games (whether your team or other teams).
Clicking the icon button will toggle the main interface of this mod: the railway GUI. By default, the railway GUI does not show the settings panel nor the filters panel. And it is only listing stalled trains, in trouble trains, and manual trains. (For train status, please see below sections.)
Notice that this list will only ever shows the trains of your team (force). Players from other teams cannot see status of your trains, and vice versa.

The following info details of the trains are displayed in the list table (or within tooltips):
- Status
- Train ID
- Name of leading locomotive
- Colour of leading locomotive
- Item contents
- Fluid contents
- Type of carriages
- Length
- Weight
- Name of (next) station
- Name of line
- Surface located
Buttons & Filters
To change the type of trains in the display list, you can click the settings icon and filters icon on the frame title bar. (See below screenshot.) These icons will toggle the settings panel and filters panel respectively.
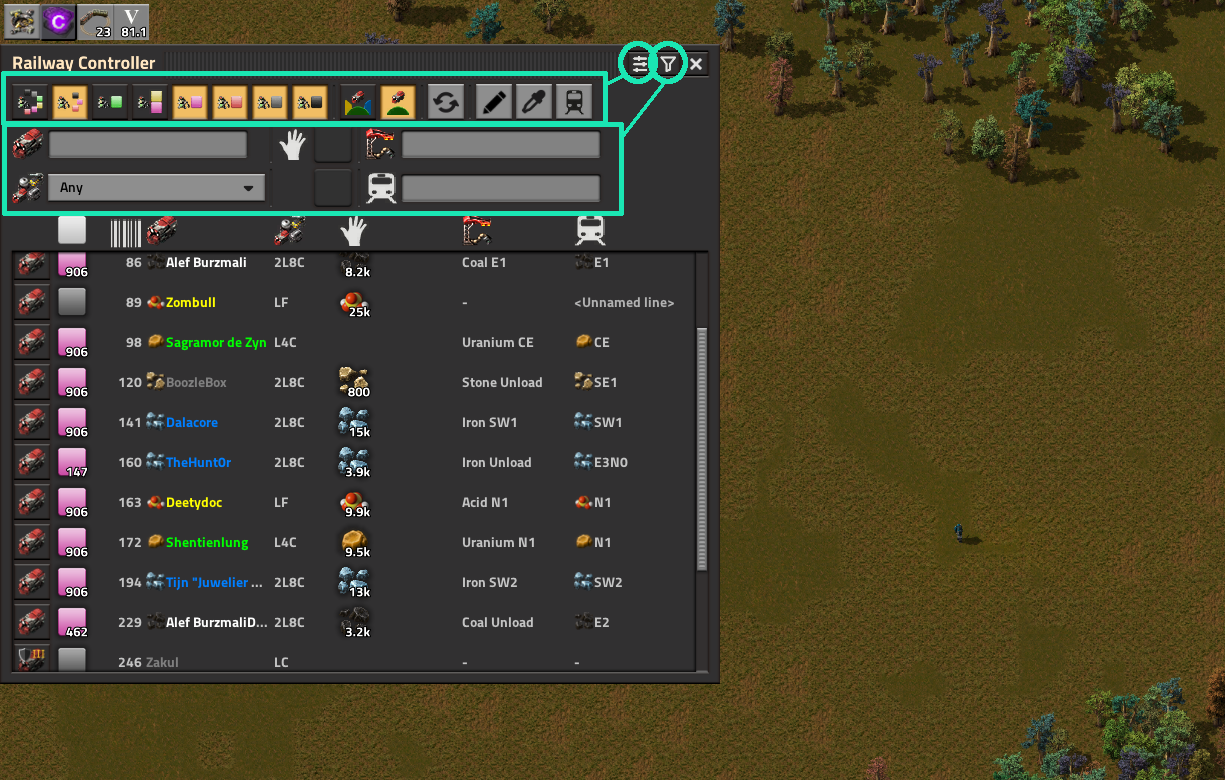
The first group of buttons in the settings panel allow you to toggle show of trains with certain status. For example, the leftmost "Toggle show all trains" button will include trains of all statuses in the list, even if they are normally operating trains that have the green (moving) or yellow (waiting) status. The following buttons are available:
- Toggle show all trains
- Toggle show in trouble trains (Including statuses black, magenta and red.)
- Toggle show moving trains
- Toggle show waiting trains (Including statuses yellow and magenta.)
- Toggle show stalled trains
- Toggle show stopped trains
- Toggle show manual trains
- Toggle show immobile trains
The second group of buttons in the settings panel allow you to toggle show of trains on various surfaces. They are useful (only) if you are playing with mods and/or scenarios that involve different surfaces. The following buttons are available:
- Toggle show trains on all surfaces
- Toggle show trains on same surface
The third group of buttons in the settings panel are maintenance buttons. Currently, there is only one button available:
- Refresh
The fourth (last) group of buttons in the settings panel allow you to toggle the editing GUIs. For details, please read the below section. The following buttons are available:
- Rename
- Colour
- Schedule
The filters panel contains various fieleds, allowing you to narrow down the list by certain filter conditions. Applicable filter conditions includes:
- Status
- Surface located
- Name of (leading) locomotive
- Type of carriages
- Item contents
- Fluid contents
- Name of (next) station
- Name of line
- Any combinations of above
Editing
The edit buttons in the settings panel will open up the editing GUIs. Currently, there are three editing GUIs available:
- Rename
- Colour
- Schedule

Note that from 0.17.5 / 0.18.5 / 1.0.3 / 1.1.4 onwards, it is also possible to open all editing GUIs together, by holding CONTROL button and mouse clicking on a train entry row.
Renaming Train
- Click on "Rename" button on settings panel.
- The Rename window should pop up, by step 1.
- Click on the row (texts) of the train in the railway table, which you desire to rename. (Note that the leading carriage has to be a locomotive to have a name, due to restriction of game mechanism.)
- The train ID and name should show up in the Rename window, if the selection by step 3 is successful.
- Enter desired train name in the text field.
- Tick the checkbox "Rename all carriages", if you desire to rename all carriages of the train. Untick it, if you prefer to rename the leading carriage only.
- Click on the green "Apply" button.
- The train should be renamed, by step 7.
- Repeat from step 3, if you wish to rename other trains.
Saving Name Template
- Click on "Rename" button on settings panel.
- The Rename window should pop up, by step 1.
- Click on the expand button to the top right corner of the window, if template controls are not shown on the right yet.
- Input desired text to the "Name" textfield.
- Select a slot in the listbox. Select an existing slot if you desire to overwrite it, or select the bottom empty slot to add it as new one.
- Click on the "Save as template" button.
- The name should be shown in the selected slot, by step 6.
- Repeat from step 4, if you wish to save other name templates.
Using Name Template
- Click on "Rename" button on settings panel.
- The Rename window should pop up, by step 1.
- Click on the expand button to the right of the window, if template controls are not shown on the right yet.
- Click on the row (texts) of the train in the railway table, which you desire to rename. (Note that the leading carriage has to be a locomotive to have a name, due to restriction of game mechanism.)
- Select a slot in the listbox, which you desire to use the template.
- Click on the "Append to front" button if you wish to add the template to front of text in the "Name" textfield. Click the "Append to back" button if you wish to add to the end of text instead. Click the "Replace" button to replace the text.
- Click on the green "Apply" button.
- The train should be renamed, by step 7.
- Repeat from step 4, if you wish to rename other trains.
Removing Name Template
- Click on "Rename" button on settings panel.
- The Rename window should pop up, by step 1.
- Click on the expand button to the right of the window, if template controls are not shown on the right yet.
- Select a slot in the listbox, that you wish to remove.
- Click on the "Remove template" button.
- The selected template should be removed, by step 6.
- Repeat from step 4, if you wish to remove other name templates.
Painting (Colouring) Train
- Click on "Colour" button on settings panel.
- The Colour window should pop up, by step 1.
- Click on the row (texts) of the train in the railway table, which you desire to paint.
- The train ID and colour should show up in the Colour window, if the selection by step 3 is successful.
- Select desired train colour in the text fields or sliders.
- Tick the checkbox "Paint all carriages", if you desire to paint all carriages of the train. Untick it, if you prefer to paint the leading carriage only.
- Click on the green "Apply" button.
- The train should be painted, by step 7.
- Repeat from step 3, if you wish to paint other trains.
Saving Colour Template
- Click on "Colour" button on settings panel.
- The Colour window should pop up, by step 1.
- Click on the expand button to the right of the window, if template controls are not shown on the right yet.
- Input desired colour to the text fields or sliders.
- Select a slot in the listbox. Select an existing slot if you desire to overwrite it, or select the bottom empty slot to add it as new one.
- Click on the "Save as template" button.
- The colour should be shown in the selected slot, by step 6.
- Repeat from step 4, if you wish to save other colour templates.
Using Colour Template
- Click on "Colour" button on settings panel.
- The Colour window should pop up, by step 1.
- Click on the expand button to the right of the window, if template controls are not shown on the right yet.
- Click on the row (texts) of the train in the railway table, which you desire to paint.
- Select a slot in the listbox, which you desire to use the template.
- Click on the "Replace" button.
- Click on the green "Apply" button.
- The train should be painted, by step 7.
- Repeat from step 4, if you wish to paint other trains.
Removing Colour Template
- Click on "Colour" button on settings panel.
- The Colour window should pop up, by step 1.
- Click on the expand button to the right of the window, if template controls are not shown on the right yet.
- Select a slot in the listbox, that you wish to remove.
- Click on the "Remove template" button.
- The selected template should be removed, by step 5.
- Repeat from step 4, if you wish to remove other colour templates.
Saving Line (Schedule Template)
- Click on "Schedule" button on settings panel.
- The Schedule window should pop up, by step 1.
- Click on the row (texts) of the train in the railway table, which you desire to save its schedule.
- The train ID and schedule should show up in the Schedule window, if the selection by step 3 is successful.
- Input desired text to the "Line" textfield.
- Click on the "Save line" button.
- The name should be shown in the schedule list box to the right of the window, by step 6.
- Repeat from step 3, if you wish to save other lines.
- Note that temporary stops are NOT saved in the line definitions. They are skipped in the saving process.
- Note that other trains will be automatically be put under the same line, if they are using the identical set of stations and waiting conditions.
Using Line (Schedule Template)
- Click on "Schedule" button on settings panel.
- The Schedule window should pop up, by step 1.
- Click on the row (texts) of the train in the railway table, which you desire to save its schedule.
- The train ID and schedule should show up in the Schedule window, if the selection by step 3 is successful.
- Select the line in the line listbox, that you wish to use.
- Click on the "Load line" button.
- The schedule of the train should be updated. The train is forced to be in manual mode, so it is not moving yet.
- Click on the slot of the station name you wish to go, then click on the "Go to the station" button. Or else you can click on the "Automatic" switch to start the train.
- Repeat from step 3, if you wish to apply to other trains.
Removing Line
- Click on "Schedule" button on settings panel.
- The Schedule window should pop up, by step 1.
- Select the line in the line listbox, that you wish to remove.
- Click on the "Remove line" button.
- The selected line should be removed, by step 6.
- Repeat from step 3, if you wish to remove other lines.
- Note that it only removes the line (schedule template) only. It does NOT affect the schedule of any related trains.
Viewing Line
- Click on "Schedule" button on settings panel.
- The Schedule window should pop up, by step 1.
- Select the line in the line listbox, that you wish to view.
- Click on the "View line" button.
- The list of stations involved should be shown in the station listbox.
- Repeat from step 3, if you wish to view other lines.
Note that Rich text is supported in the names of locomotives, stations, and lines. Good use of them can help organizing your railway a lot.